We're working on preparing this site for the 2026 FRC season, some areas may be unfinished or change in the near future.
If you would like to help improve FiM AV Docs, open a PR on GitHub!
This page is intended to be used by FiM AV Staff/Leads only.
This documentation is intended for people who are already very familiar with FiM’s AV setup. Untested software installs or configuration changes can cause interruptions to your event.
If something isn’t working or your event requires special configuration, please reach out to
@av-staffin Slack, we’re happy to work with you to ensure everything runs smoothly.
Realtek Vlans
The AV Cart communicates with 3 separate networks through the motherboard’s onboard network interface card (NIC). This is done by utilizing vlan trunking. This requires a special setup on the AV Cart’s side to accept these vlans.
While rare, it is possible that the configuration on the AV Cart’s side may be incorrect or broken.
This document will cover how to check the configuration and how to fix it if necessary.
Check VLANs
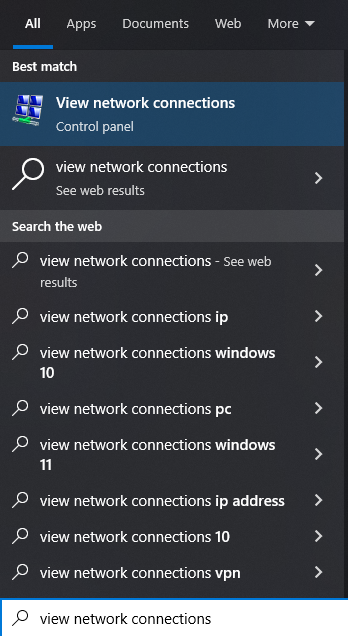
Open the start menu and search for “View Network Connection” and open it. 
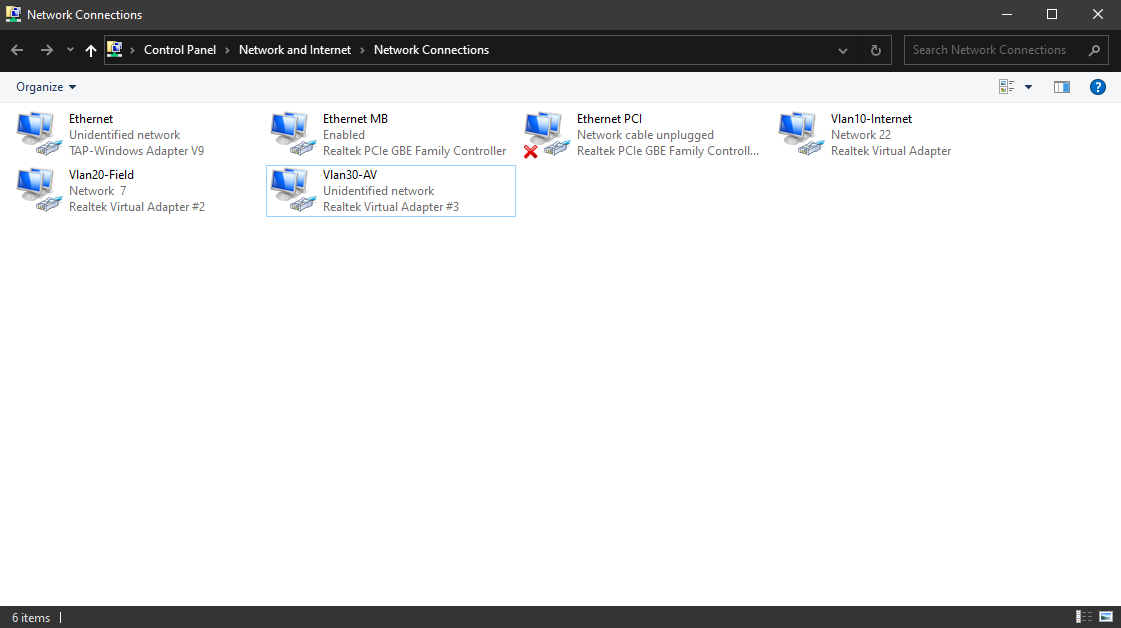
There should be 3 “Realtek Virtual Adapter” entries. If there are less than 3, follow the below steps. The steps below will also work on fresh installs of windows. 
Setup VLANs
Ensure that the “Realtek Ethernet Diagnostic Utility” is installed by searching “realtek” in the start menu. If it is not installed, you can download it and install it here. If offline (which you may be) the installer is also located on the G drive under G:/My Drive/FiM/Cart Setup.
If you are in an absolute bind, you can plug your internet drop into the auxillary (PCIe) network card and use that to download the driver/access the internet.
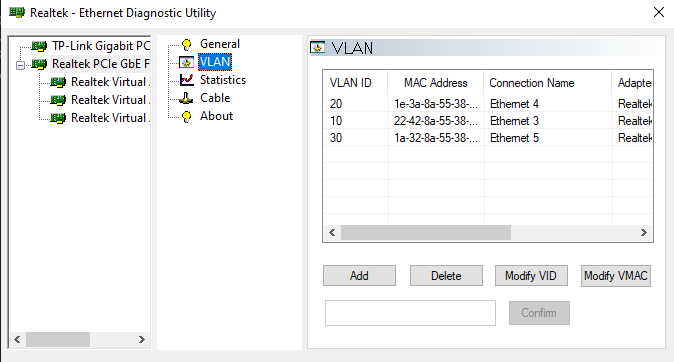
Open the “Realtek Ethernet Diagnostic Utility”, twirl open the “Realtek PCIe GBE Family Controller” and click on “VLAN”.

Delete any existing VLANs by selecting each entry and clicking the “Delete” button.
Click the “Add” button and enter
10to add an entry for VLAN 10. Once typed, press enter. It may take a second before you can add the next entryRepeat step 4 for VLAN
20and VLAN30.
Setup Virtual NICs
Open the “Network Connections” panel by searching for it in the start menu, similar to above.
Right-Click -> “Rename” lowest numbered Virtual Adapter (Realtek Virtual Adapter) as “Vlan10-Internet”, the second lowest (Realtek Virtual Adapter #2) as “Vlan20-Field”, and the third lowest (Realtek Virtual Adapter #2) as “Vlan30-AV”.
Right-Click -> “Properties” on “Vlan30-AV”.
Click “Internet Protocol Version 4 (TCP/IPv4)” and then click the “Properties” button.
Select “Use the following IP address” and enter
192.168.25.<cart-number>0for the IP address. Replace<cart-number>with the cart number. For example, cart 1 would be192.168.25.10. Use the subnet mask255.255.255.0and leave the default gateway and DNS information blank.Select “Advanced”, toggle off “Automatic Metric” and enter
105for the metric.The metric is used to determine which interface to use when multiple interfaces are available. The lower the metric, the higher priority it has. For our use case, the internet interface gets the highest priority metric so that the majority of our traffic goes through it.
Click “OK” to close the the advanced window. Click “OK” to close the IPv4 properties window. Click “OK” to close the “Vlan30-AV” properties window.
Right click “Vlan20-Field” and select “Properties”. Repeat step 6-7 using an interface metric of
100.Right click “Vlan10-Internet” and select “Properties”. Repeat step 6-7 using an interface metric of
1.
All set!